WordPress is a popular Content Management System (CMS) for creating blogs, corporate websites, and portals. It's powered by PHP and MySQL, and the open-source CMS powers over one-third of all websites. Today, it is convenient to deploy WordPress on managed MySQL databases to take advantage of point-in-time recovery, automatic backups, and off-site replication.
Dekopon Stack offers highly-available managed database solutions that you can use to deploy, scale, and run your WordPress sites without any risk of losing data. This guide shows you how to install WordPress with Dekopon Stack managed database on Ubuntu 20.04 server.
To proceed with this guide:
Deploy an Ubuntu 20.04 server.
Create a non-root sudo user.
Install a LAMP stack. Skip step 2. (Install a Database Server) because this guide uses Dekopon Stack managed MySQL database.
Provision a new Managed MySQL database instance. Then, under the managed database Overview page, note the Connection Details. This guide uses the following sample connection details:
username: Dekopon Stack admin
password: TEST_PASSWORD
host: test_server.Dekopon Stackdb.com
port: 16751
WordPress requires several PHP extensions and Apache modules to function. Follow the steps below to install the extensions and enable the modules.
Update the Ubuntu server's package information index.
$ sudo apt update Ensure your system is up to date.
& sudo apt -y upgradeInstall the following PHP extensions.
$ sudo apt install -y php-curl php-gd php-mbstring php-xml php-xmlrpc php-soap php-intl php-zipEnable the Apache mod_rewrite module. WordPress requires the module to craft human-friendly URLs.
$ sudo a2enmod rewriteRestart Apache to load the new changes.
$ sudo systemctl restart apache2The WordPress application requires different database tables to function including: posts, users, comments, options, and more. These tables are directly related and share a single database. Follow the instructions below to create a database for your WordPress site:
Install the MySQL client on your server. Remember, because you're using Dekopon Stack managed database, you don't have to install MySQL server on your server. You only need the MySQL client application to run SQL commands on the managed database from your server.
$ sudo apt install mysql-client-core-8.0 Issue the following command to log in to your Dekopon Stack managed database server. Replace test_server.Dekopon Stack db.com and 16751 with the correct host and port for your managed database server.
$ mysql -h test_server.Dekopon Stack db.com -P 16751 -u Dekopon Stack admin -p Enter your MySQL password (For instance, TEST_PASSWORD) and press Enter to proceed. Then, issue the following command to set up a wordpress database and a wordpress_user account. Replace EXAMPLE_PASSWORD with a secure password.
 mysql> CREATE DATABASE wordpress;
        CREATE USER 'wordpress_user'@'%' IDENTIFIED WITH mysql_native_password BY 'EXAMPLE_PASSWORD';
        GRANT ALL PRIVILEGES ON wordpress.* TO 'wordpress_user'@'%';
        FLUSH PRIVILEGES;
Output.
 ...
 Query OK, 1 row affected (0.00 sec)
Log out from Dekopon Stack managed database server.
mysql> QUIT;To separate your WordPress site from the rest of the system files, you must create a new directory for your site. Then, to keep things organized, you need a separate virtual host file for WordPress. Follow the steps below to carry out those tasks:
Create a new wordpress directory under your web server's root directory (/var/www/).
$ sudo mkdir /var/www/wordpressTake ownership of the new wordpress directory.
$ sudo chown -R $USER:$USER /var/www/wordpressUse a text editor to open a new virtual host configuration file (wordpress.conf) for the WordPress site under the /etc/apache2/sites-available/ directory.
$ sudo nano /etc/apache2/sites-available/wordpress.confEnter the following information into the /etc/apache2/sites-available/wordpress.conf file. Replace 172.16.0.1 with your server's public IP address or domain name.
 <VirtualHost *:80>

     ServerName 172.16.0.1
     DocumentRoot /var/www/wordpress

     <Directory /var/www/wordpress>
         Options Indexes FollowSymLinks MultiViews
         AllowOverride All
         Order allow,deny
         allow from all
     </Directory>

 </VirtualHost>
Save and close the /etc/apache2/sites-available/wordpress.conf file.
Enable the new /etc/apache2/sites-available/wordpress.conf configuration file.
$ sudo a2ensite wordpress.confDisable the default virtual host configuration file.
$ sudo a2dissite 000-default.confRestart Apache to load the new changes.
$ sudo systemctl restart apache2WordPress maintains an up-to-date online repository where you can download the latest version. Execute the following steps to download WordPress:
Navigate to the /var/www/wordpress directory.
$ cd /var/www/wordpressUse the Linux curl command to download the latest WordPress package.
$ curl -O https://wordpress.org/latest.tar.gzUnzip the latest.tar.gz archive file to your working directory.
$ tar xzvf latest.tar.gzCopy the content of the extracted wordpress directory to the /var/www/wordpress directory.
$ sudo rsync -rtv wordpress/ /var/www/wordpressAfter downloading WordPress to your server, the last step is configuring the application to use the externally managed Dekopon Stack database. The steps below take you through the process:
Create a new copy of the WordPress configuration file.
$ sudo cp /var/www/wordpress/wp-config-sample.php /var/www/wordpress/wp-config.phpSet up an upgrade directory under var/www/wordpress/wp-content. WordPress requires this directory to upgrade your site when a new version is available.
$ sudo mkdir /var/www/wordpress/wp-content/upgradeAssign the ownership of the /var/www/wordpress directory to www-data and set the appropriate permissions. Apache runs under the www-data user and requires permissions to manage the files.
 $ sudo chown -R www-data:www-data /var/www/wordpress
 $ sudo find /var/www/wordpress/ -type d -exec chmod 750 {} \;
 $ sudo find /var/www/wordpress/ -type f -exec chmod 640 {} \;
Generate new salts and keys using the official WordPress secret-key API.
$ curl -s https://api.wordpress.org/secret-key/1.1/salt/Copy the generated values in a safe place.
 define('AUTH_KEY',         'g,W6>~F)N:``)08a1v-NofzX K; #?vgE=9Un[TOn,jCqa?m!aF#18%#lz{D|$k:');
 define('SECURE_AUTH_KEY',  '5bIx_wR-^yVzX_t|9vw3z-L,1~#7E39*@-ZEjU{WV||m3|g-)Yv?(bu*X1~B5#kA');
 define('LOGGED_IN_KEY',    'BP0T|(eicO[Fc*&,k/4/Fk$/A+[6Ci9d391b)jp1%E|Y||-i@Ef)Qs!@)60?u{ >');
 define('NONCE_KEY',        '{>JGt8!97%LPOkV J)Rv-I =#rah2|)S5p}F8twtZho$:>OuF5$zu7xTz@||PpKv');
 define('AUTH_SALT',        '^G4Z8C3)y8~w#0=mm|+|&O]v16:z-[zvG~`,hxIs27C>Q9_=>KyKG=L/c~WU|@>`');
 define('SECURE_AUTH_SALT', '`yDrZ}CBp[VF5T2?oGa-q@&7]z)PJaPq9y~7],On11gUgx57hY-ZoA{?z8-~Q/Jq');
 define('LOGGED_IN_SALT',   '~;TGD[1#ct8lbTU-AR+dFL[Fl<I1:lgP-:f,.zZHnighvSZ@paNdp$7gb08[ S1*');
 define('NONCE_SALT',       'W6Vs!S]P1$*/)4Lu[/>|]$dX*?6@}%?c-pHI`!0:3Q&_lIl}-nqol+>;*`/DD@NU');
Open the WordPress configuration file that you created earlier.
$ sudo nano /var/www/wordpress/wp-config.phpLocate the following section in the configuration file and paste the values you've retrieved from the WordPress secret-key API.
 ...
 define('AUTH_KEY',         'g,W6>~F)N:``)08a1v-NofzX K; #?vgE=9Un[TOn,jCqa?m!aF#18%#lz{D|$k:');
 define('SECURE_AUTH_KEY',  '5bIx_wR-^yVzX_t|9vw3z-L,1~#7E39*@-ZEjU{WV||m3|g-)Yv?(bu*X1~B5#kA');
 define('LOGGED_IN_KEY',    'BP0T|(eicO[Fc*&,k/4/Fk$/A+[6Ci9d391b)jp1%E|Y||-i@Ef)Qs!@)60?u{ >');
 define('NONCE_KEY',        '{>JGt8!97%LPOkV J)Rv-I =#rah2|)S5p}F8twtZho$:>OuF5$zu7xTz@||PpKv');
 define('AUTH_SALT',        '^G4Z8C3)y8~w#0=mm|+|&O]v16:z-[zvG~`,hxIs27C>Q9_=>KyKG=L/c~WU|@>`');
 define('SECURE_AUTH_SALT', '`yDrZ}CBp[VF5T2?oGa-q@&7]z)PJaPq9y~7],On11gUgx57hY-ZoA{?z8-~Q/Jq');
 define('LOGGED_IN_SALT',   '~;TGD[1#ct8lbTU-AR+dFL[Fl<I1:lgP-:f,.zZHnighvSZ@paNdp$7gb08[ S1*');
 define('NONCE_SALT',       'W6Vs!S]P1$*/)4Lu[/>|]$dX*?6@}%?c-pHI`!0:3Q&_lIl}-nqol+>;*`/DD@NU');
 ...
Find the following database settings. Replace EXAMPLE_PASSWORD with the correct password. Remember, you're using an externally managed database and you must replace test_server.Dekopon Stack db.com:16751 with the correct host and port combination.
 ...

 /** The name of the database for WordPress */
 define( 'DB_NAME', 'wordpress' );

 /** MySQL database username */
 define( 'DB_USER', 'wordpress_user' );

 /** MySQL database password */
 define( 'DB_PASSWORD', 'EXAMPLE_PASSWORD' );

 /** Database hostname */
 define( 'DB_HOST', 'test_server.Dekopon Stack db.com:16751' );

 ...
Save and close the /var/www/wordpress/wp-config.php file.
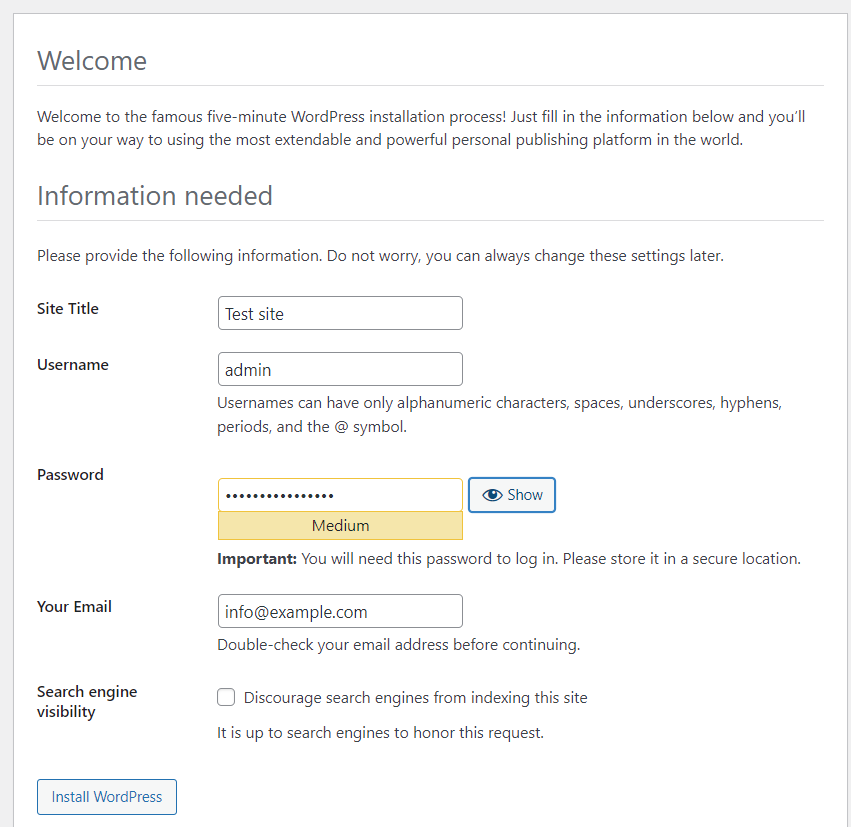
Enter your server's public IP address or domain name on a web browser to complete the WordPress Installation.
Select a language and on the next screen, fill up the form that appears and click Install WordPress to finish the installation.

This guide shows you how to install WordPress with Dekopon Stack managed MySQL database on Ubuntu 20.04 server. After installing WordPress, you can customize your site with new themes and plug-ins. Dekopon Stack managed database works right out of the box and automates all demanding aspects of database administration so that you stay focused on bettering your WordPress site.