Although its development was somewhat delayed compared to other control panels, CloudLinux now fully integrates with DirectAdmin. CloudLinux is based on CentOS, so the largest part of your infrastructure will most likely still function. CloudLinux' current version is based on CentOS 7.
In this guide, we assume you have the latest DirectAdmin version, though they will work on less recent versions as well. Furthermore, this guide is based and tested on CentOS 7. Older CentOS versions, such as CentOS 6, will most likely not work correctly.
You will need root access to proceed with these steps.
CloudLinux would most likely not break anything. Even though the system is setup to automatically correct itself, there's a few techniques after CloudLinux you should monitor yourself after rolling out the new operating system.
From experience, there's not much that can go wrong in the first place, but you should be absolutely sure you can roll back at any time during the installation process. Make sure you have a working backup, even though the installation can and probably will go flawlessly.
When your sites are caged (using CageFS) make sure the allocated resources are sufficient. Otherwise, CloudLinux could block your sites. Optionally, you can choose not to use any limits or lift them all at a later stage to be absolutely sure your sites will stay online regardless of whether your server resources are sufficient.
Yes, we will document the installation of CageFS and the integrated PHP Version Selector. CageFS can be enabled (or disabled) on a per-user basis, meaning you're able to control exactly which users will be caged and which won't.
Optionally, from DirectAdmin, there's an option to specify if newly created users should automatically be caged or not.
There will indeed be downtime, due to reboots but also possible troubleshooting. Make sure to announce this maintenance to your users beforehand as CloudLinux' installation can have quite a (positive) impact.
From here onwards, we assume you have the following:
First off, let's convert our current CentOS installation to the CloudLinux operating system, giving you access to all its features. In order to install this, a license key is needed; either a free trial, or you can purchase a license either through CloudLinux or a license vendor.
Make sure to have your license key at hand, unless you have an IP-based license; you would not need to enter a license key then.
Firstly, we'll download the cldeploy script:
cd /home
wget https://repo.cloudlinux.com/cloudlinux/sources/cln/cldeploy
If wget is not yet installed, install it first:
yum install wgetThen attempt to execute the command again.
In case you have an activation key, execute:
cd /home
sh cldeploy -k YOURKEY
Replace "YOURKEY" with your license key.
In case you have an IP-based license, CloudLinux will automatically detect your outbound IP address by executing:
sh cldeploy -iThe CloudLinux installation script will automatically detect your environment, if applicable the virtualization used (KVM in the case of Dekopon Stack) and the control panel used. Therefore, the needed plugins (such as the LVE Manager) will automatically be installed to your DirectAdmin control panel.
After the script has finished, you will need to reboot the server:
rebootSSH back into your server. To make sure the CloudLinux operating system is active on your server, we can check the kernel:
uname -a | grep lveIf this returns output, the CloudLinux kernel (and therefore its operating system) was successfully installed. In case there is no output and your terminal is blank, the correct kernel was not installed. In this case we highly recommend debugging this issue on another server.
Your CentOS operating system should now have been converted to CloudLinux OS.
CloudLinux' PHP version selector sits on top of CageFS. The PHP Version Selector allows users to 'customize' their own PHP versions by being able to pick more than two versions (which DirectAdmin allows by default) and allowing users to choose their own modules. Not only does this allow legacy software to work (inside their own cage); it allows for security as well, as users are able to disable PHP modules they don't use.
DirectAdmin's PHP versions will still stay active, however; by setting the CloudLinux PHP version to 'native', it will fall back to the DirectAdmin versions (often 5.6 and 7.0 / 7.1).
In order to make use of the PHP Version Selector we'll need to install all PHP versions by executing the following yum command. This process can take some time, though, so make sure not to leave your SSH session or use a tool such as screen. By interrupting the install you may break your setup due to an unfinished installation:
yum groupinstall alt-phpYou should be able to pick a custom PHP version from DirectAdmin as of now.
CloudLinux comes with a relatively new feature: MySQL Governor. In the default resource monitoring and its appropriate limits, MySQL databases and their resource usage aren't counted. MySQL Governor allows for better monitoring and eventually blocking and/or disabling MySQL databases automatically depending on if they meet or exceed their resource limits.
The first requirement for MySQL Governor that's often overlooked is the need to run MariaDB. Technically, it's possible to make use of MySQL Governor with MySQL, but it's system requirements are MariaDB. As MariaDB is a 'drop-in replacement' the conversion process shouldn't be too time-consuming.
Please, before continuing, make absolutely sure you have a working process. The conversion process is relatively easy but many things can go wrong in the process if not executed correctly. Create a backup using the mysql command, for example:
When you're 100% sure you have a working backup, you can start the conversion process with:
cd /usr/local/directadmin/custombuild/
./build set mysql_inst mariadb
./build set mariadb 10.0
./build update
./build mysql
Replace 10.0 with the latest MariaDB version. You can look this up on the MariaDB website. After MySQL has been swapped with MariaDB, and its functionality is proven, install the MySQL Governor package:
yum install governor-mysqlAfter the installation has been completed, execute the db-select-mysql script and specify your MariaDB version:
/usr/share/lve/dbgovernor/db-select-mysql --mysql-version=mariadbversionReplace mariadbversion with the installed MariaDB version. Next, install MySQL Governor:
/usr/share/lve/dbgovernor/mysqlgovernor.py --installMySQL Governor should now have been installed. Check if your databases are still working correctly. If so, start the service:
service db_governor startNow that CloudLinux has been installed onto your DirectAdmin server, you will see two plugins appear in DirectAdmin: "CloudLinux CageFS User Manager" and "CloudLinux LVE Manager". We'll describe their functionalities one by one here.
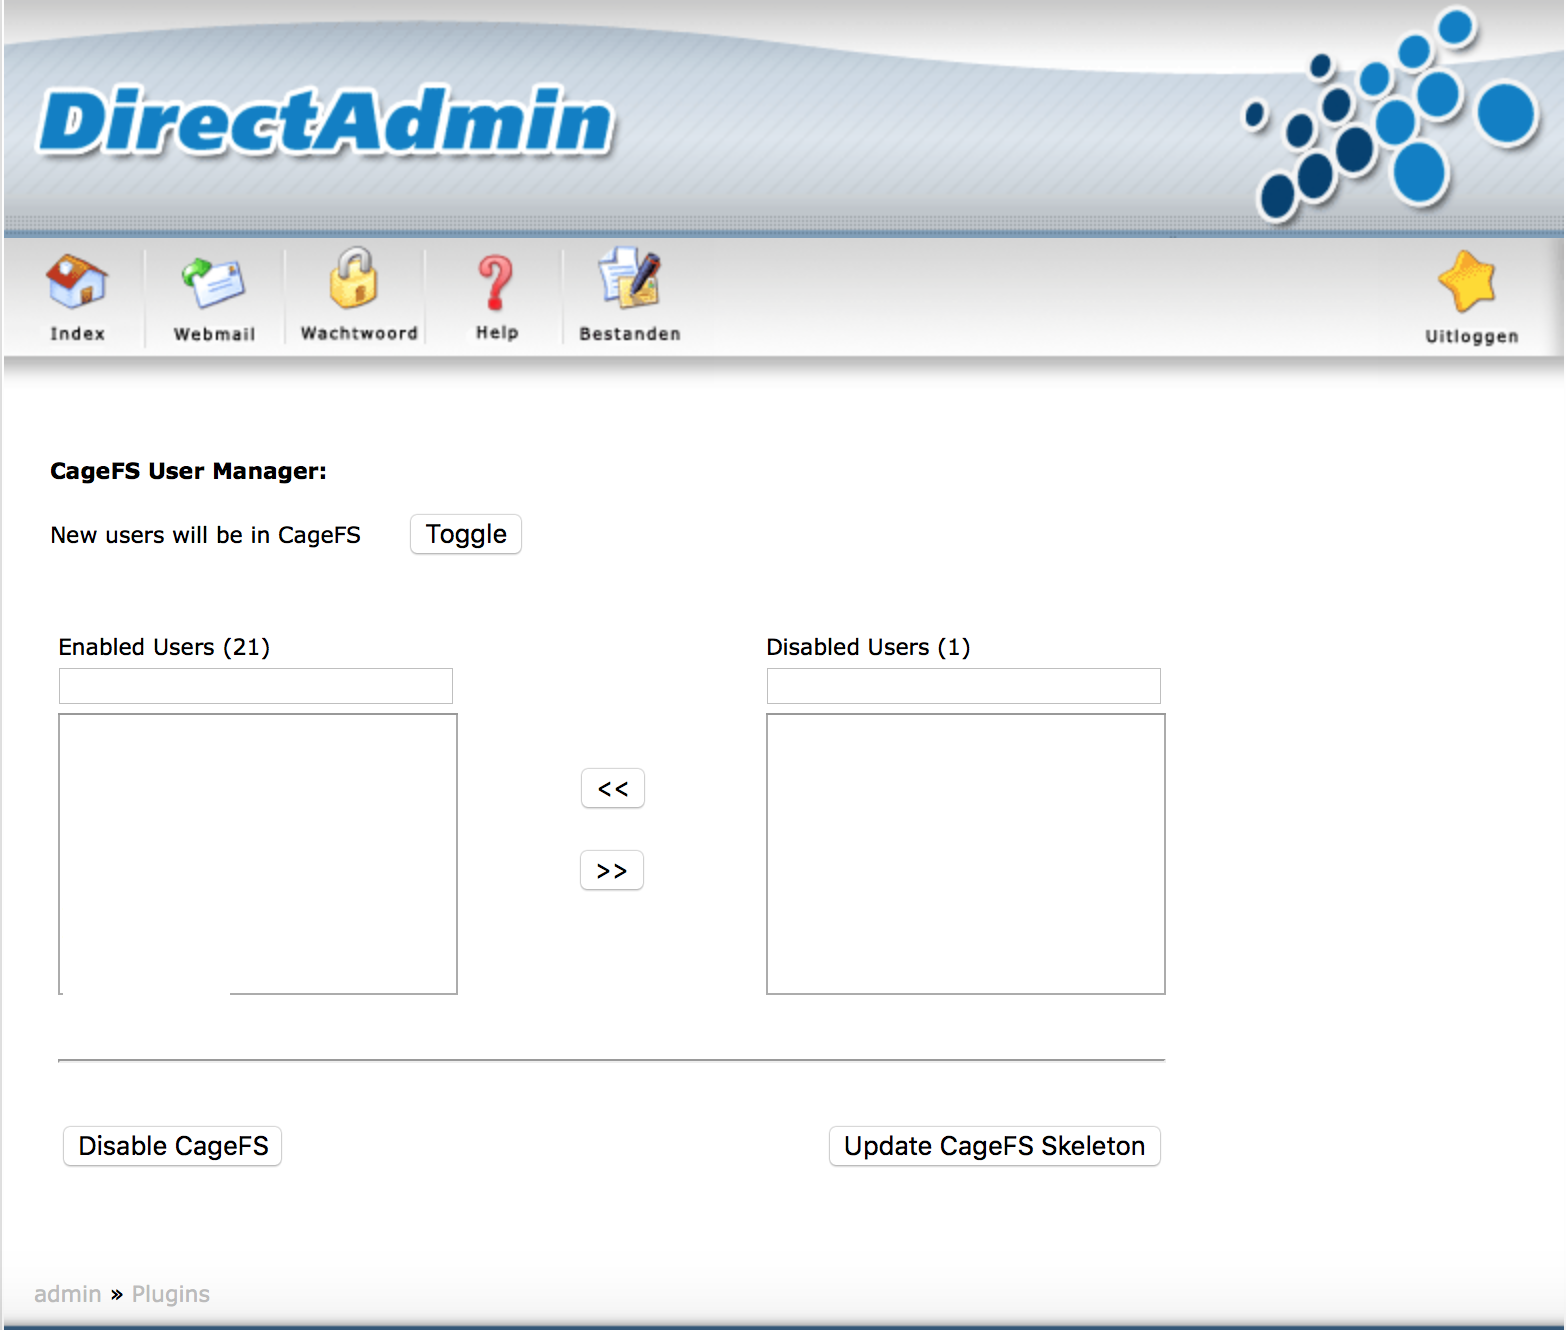
From the CloudLinux CageFS User Manager, you'll get an overview of all users on this server. Depending on their current state (enabled or disabled) there's an applied filter ("Enabled Users" and "Disabled Users").
In order to disable CageFS for a currently enabled user, simply select this specific user account and click the arrow button to the right (">>"). Vice versa for enabling CageFS for a user where it's currently disabled, click the left arrow button ("<<").
There's two more buttons, respectively on the left and the right: "Disable CageFS" and "Update CageFS Skeleton". As you might have guessed, the first button allows for completely disabling CageFS on the entire server. Be careful, though, as this will make all users' PHP versions fall back to DirectAdmin's native setting. That means users' sites might break.
The second button, "Update CageFS Skeleton", allows for pushing a change to the default user skeleton to CloudLinux' running state. CageFS makes use of skeletons for users' environments. For example, CloudLinux sets up a skeleton without the su command, so users with SSH access would not be able to elevate their permissions using that command in order to advance security. If you want to change anything about this skeleton, pushing your changes using this button is possible. However, note that small mistakes in creating a skeleton may break your setup, so be absolutely sure you know what you're doing. By default (at installation) CageFS applies its own skeleton.
The LVE Manager is somewhat more advanced and complex. Not only does it allow you to view statistics of usage of practically all accounts on the server, it allows you to change, raise or completely lift limits as well.
We'll guide you through three tabs, as these often require explanation while the other three are relatively easy to grasp (six in total).
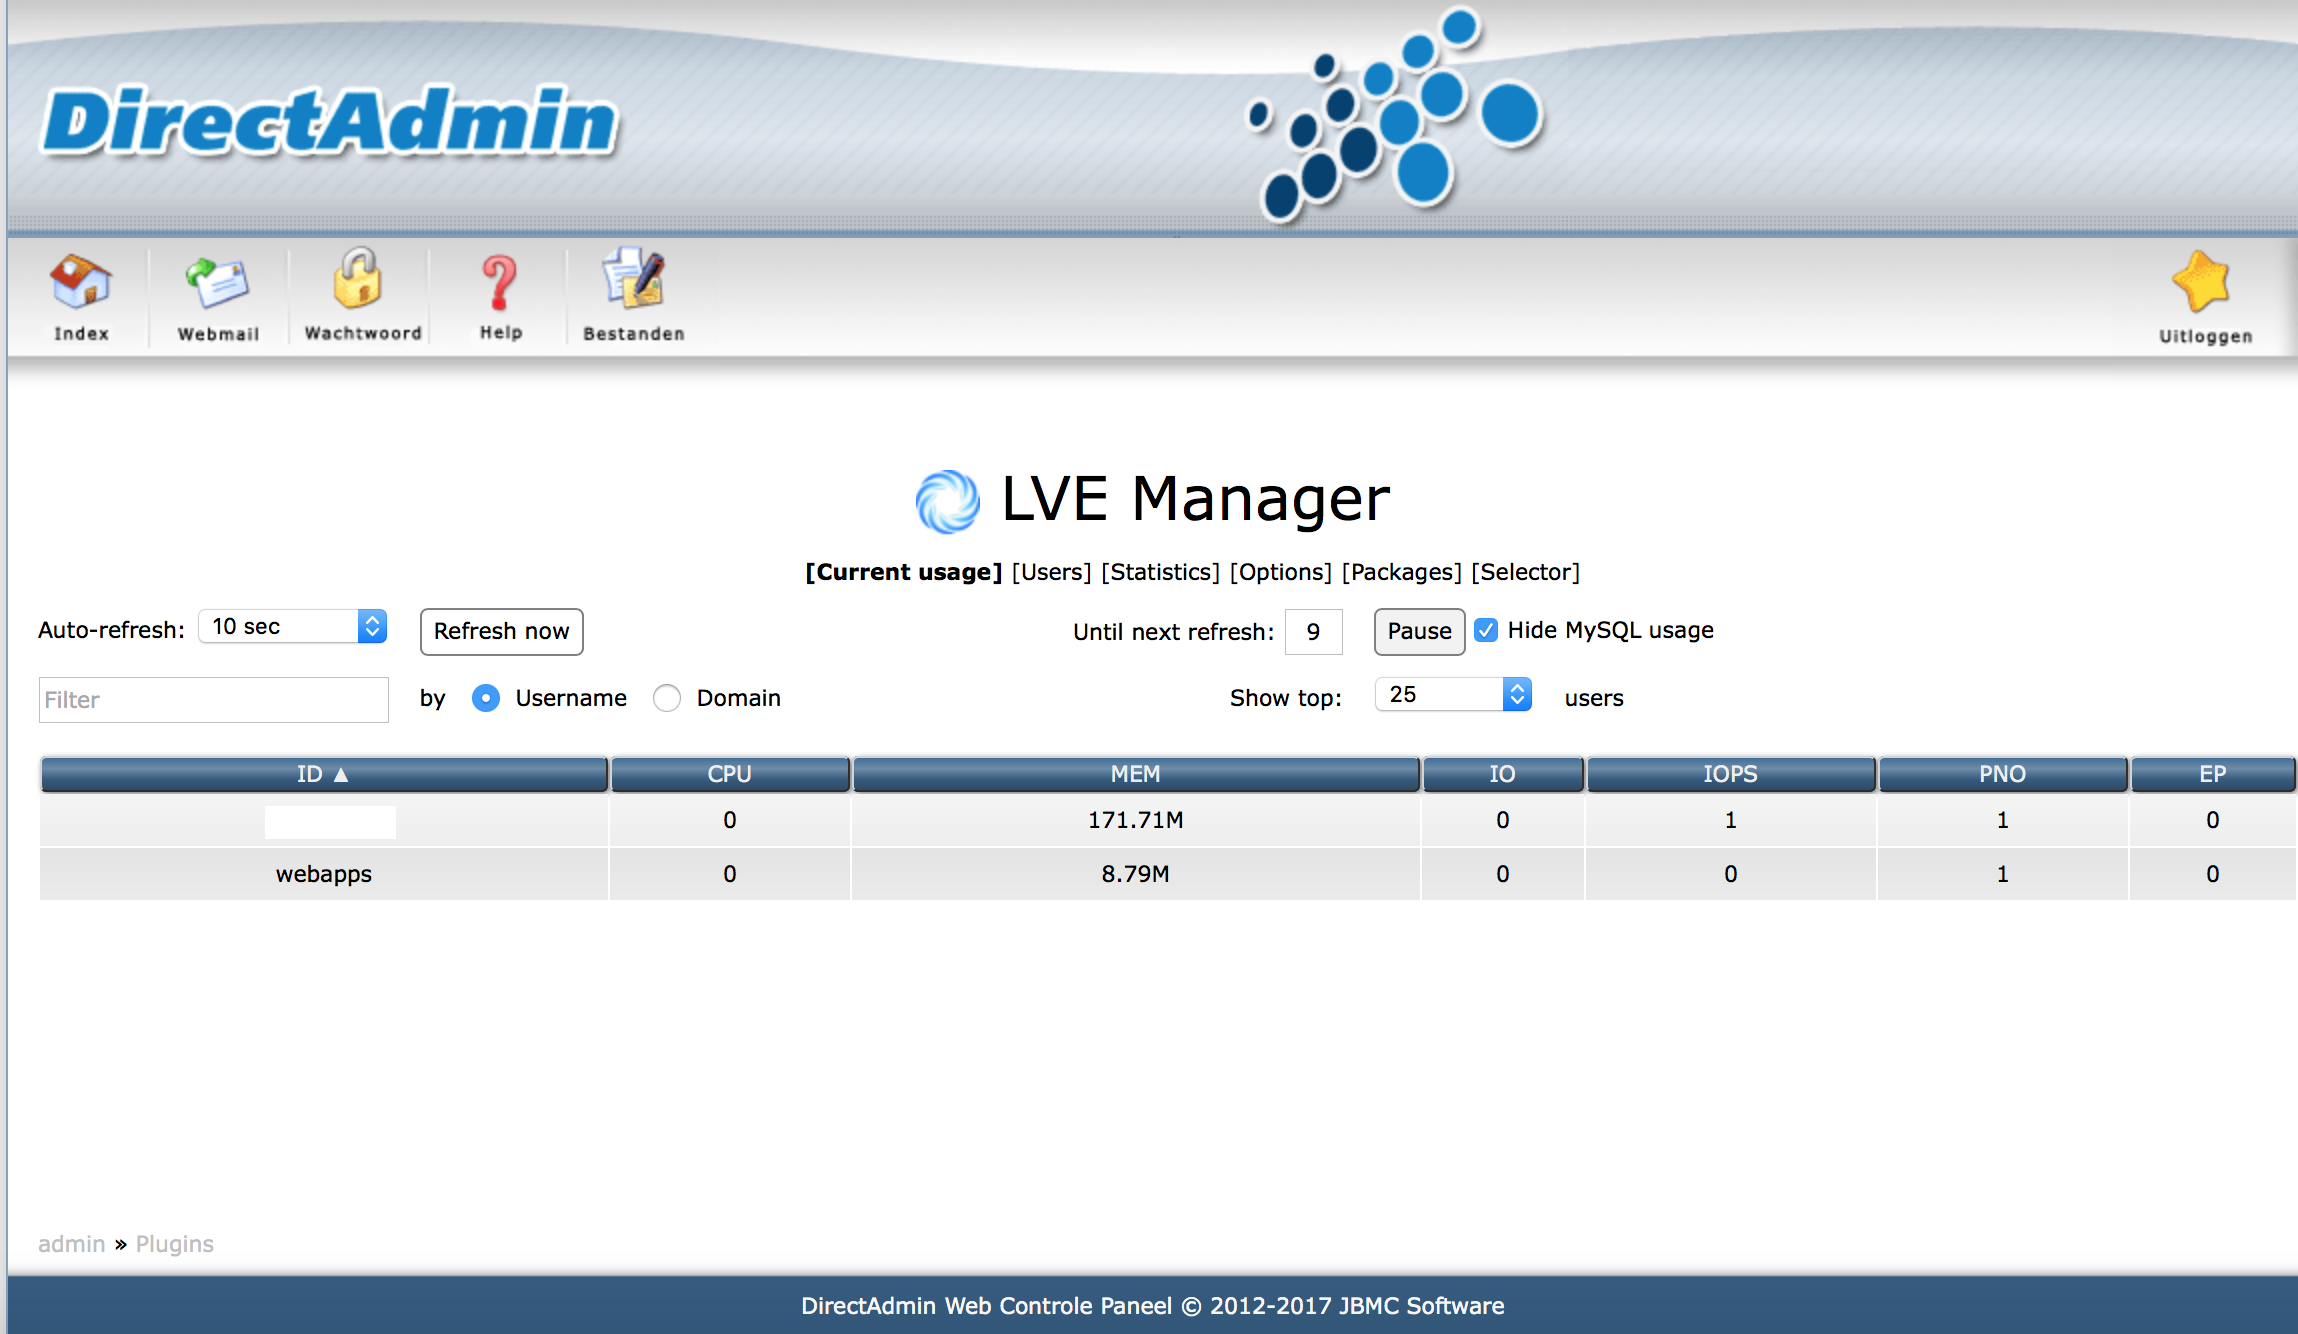
In the 'Current usage' tab you will see the top users and the resources they are currently utilizing. As you can see in the screenshot above, the 'webapps' user for example is currently using 8.79 MB of RAM and other than that, barely any system resources. However, the other account (which username was stripped) is using 171.71M of RAM, which is a significant amount in most shared hosting environments.
Using this tool we can easily find 'abuse'. Optionally, you can limit users automatically, but we'll get to that later.
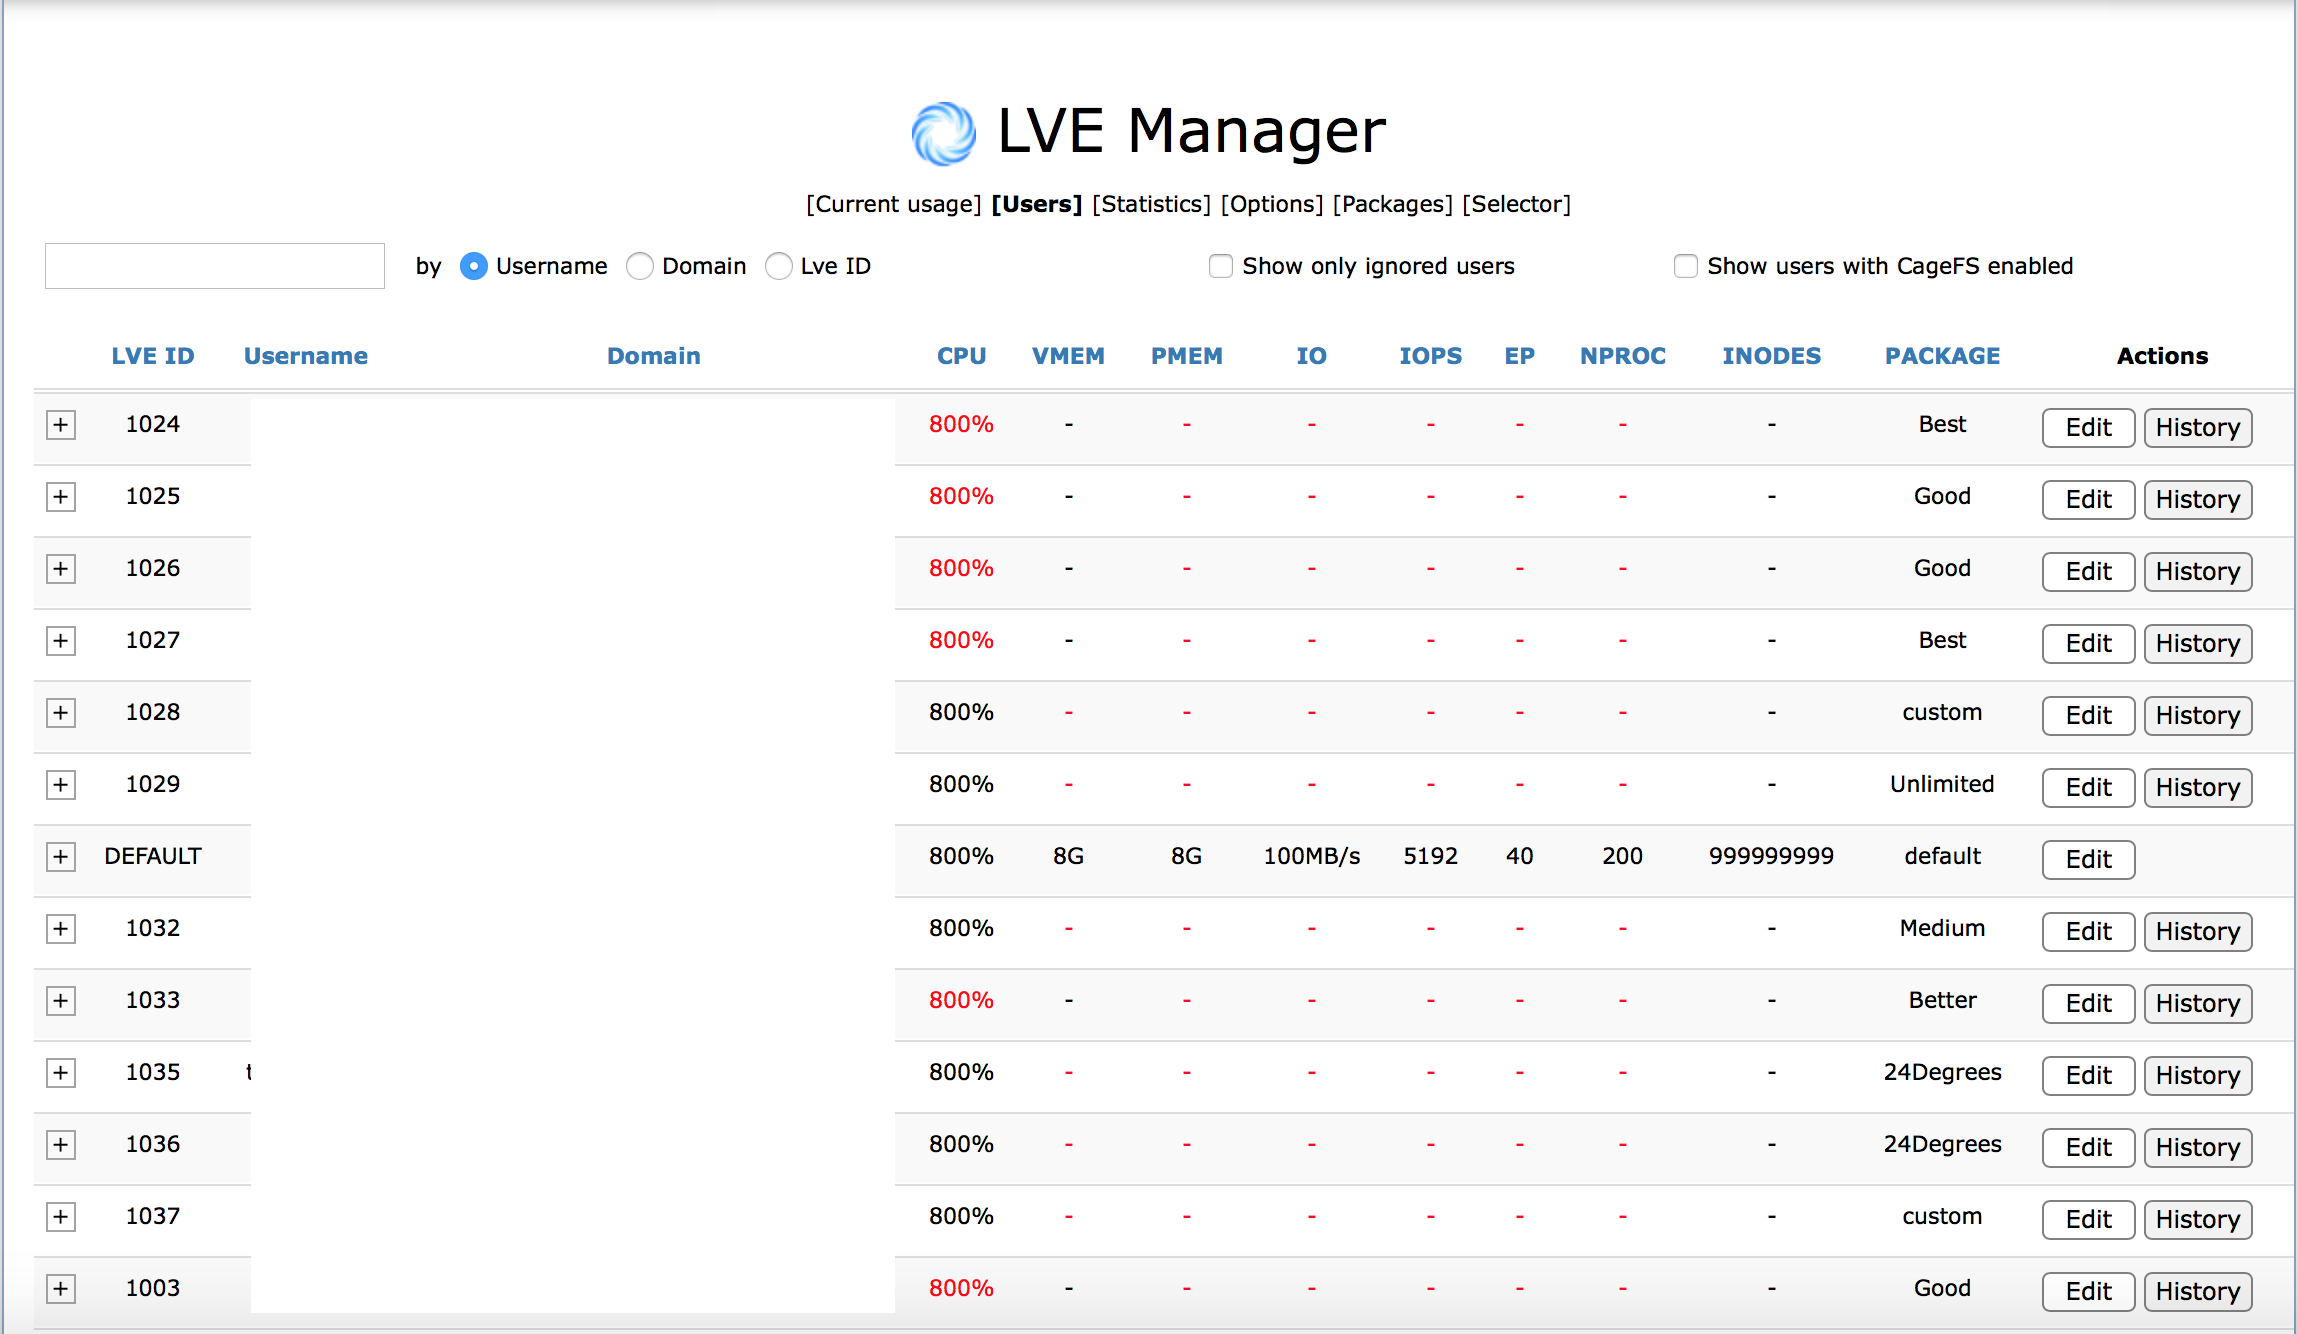
In this tab, you see all users currently on the server. On a per-user basis, you're able to alter their resource limits. When they meet or exceed those their accounts will automatically be 'blocked'.
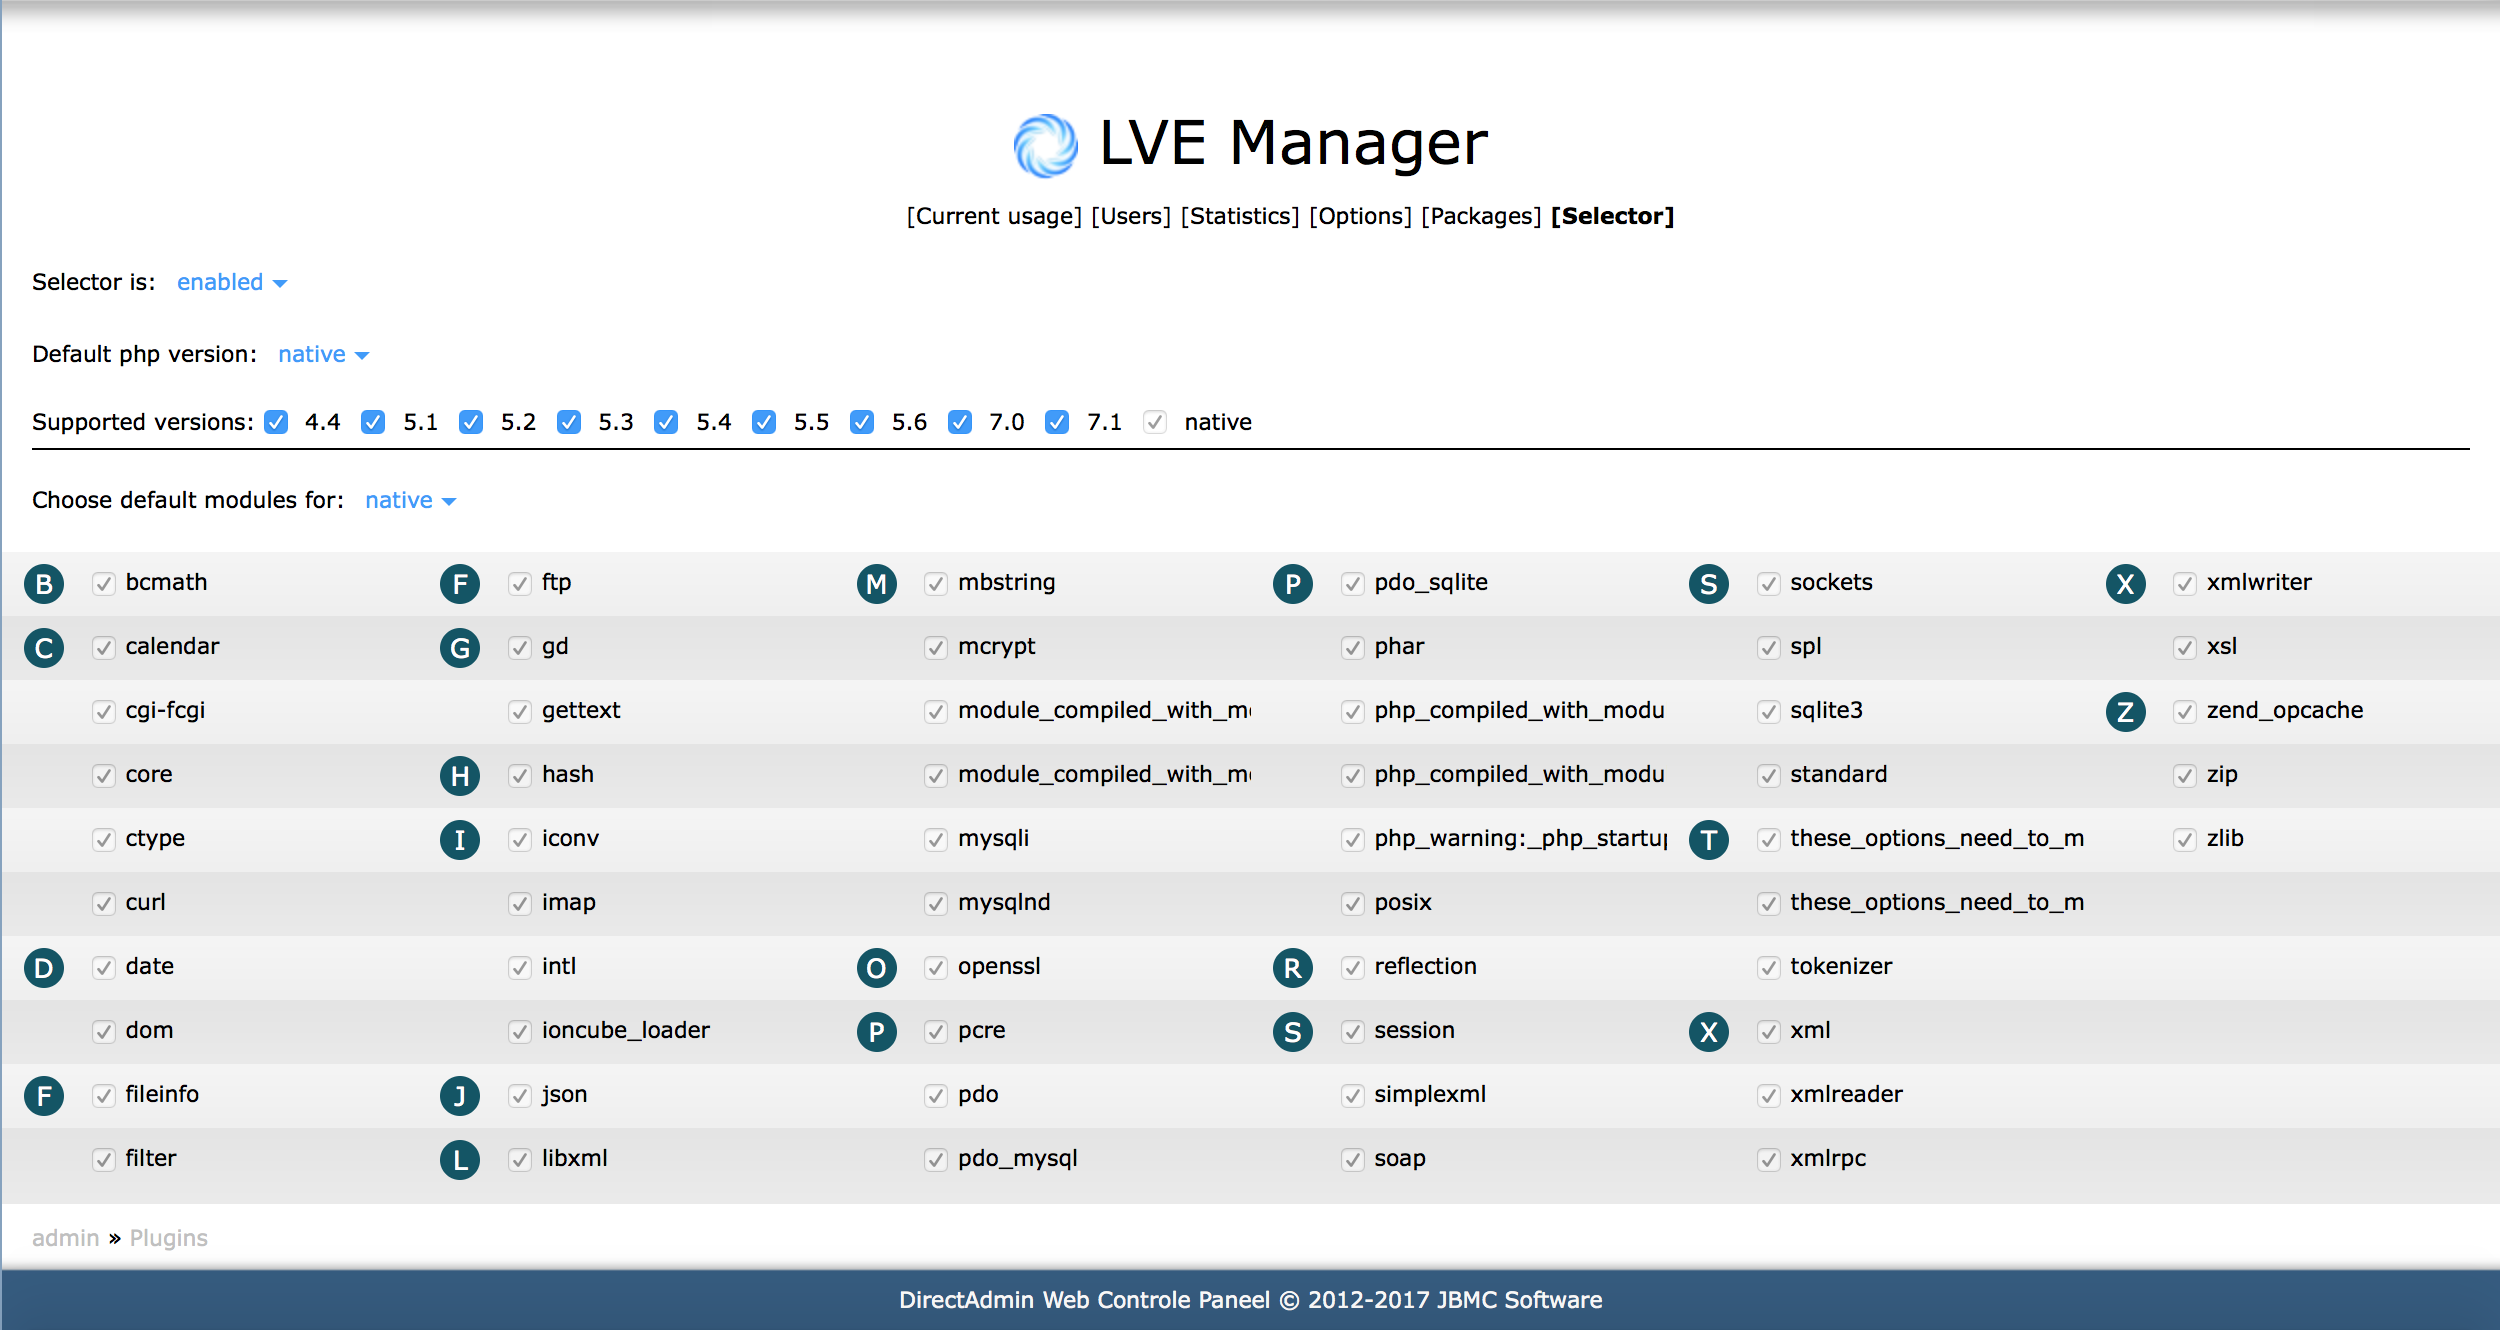
The PHP Version Selector, built by CloudLinux, allows for a great deal of freedom in picking a PHP version. Due to some of them being extremely outdated and unsafe, if a user really wants to run legacy software, they're able to. Together with CageFS other users will effectively be immune to their neighbor's practice. Considering all users are in their own 'cage' they won't be infected when other sites are.
If you decide you're very uncomfortable with allowing some PHP versions, you can completely disable the PHP Version Selector (although this would remove some recent PHP versions as well, such as PHP 7.1) or simply disallow some PHP versions by unticking them at "Supported versions". Furthermore, you're able to alter the default selected modules. Users without much technical knowledge would often rely on the default settings.
The 'native' PHP versions are one or two PHP versions installed in DirectAdmin by default. When a PHP version is picked in the PHP Version Selector, choosing a native PHP version in the 'Domain Setup' won't have any effect.